Astronomers may just found the first candidate for an earthlike planet. It 20 light years away and orbits an M-class start. It is larger than the earth and tide locked to it's star. Which means it's day is as long as it's year. It is orbiting right in the middle of the zone that supports liquid water.
Since M-class stars are so common this is good news to finding more earthlike world. The only bad part of the discovery is that the planet doesn't transit the star so they don't have any tools yet to analyze it's atmosphere.
Time for Traveller Fans to start updating their charts.
Thursday, September 30, 2010

Wednesday, September 29, 2010
Fine Art Printing and RPG Maps
I am always on the look out for a way to print and sell poster size maps economically. Currently the only remotely practical solution I know of is Cafepress and that is just barely economically. You will be paying a premium even if I don't add any profit. I can always just count it as a customer service focusing on the profitability with the main book. But the other issue is that is not bundled with the purchase of the original item (PDF or hard copy). You have to setup another account and pay a separate shipping & handling.
So I keeping an eye on what going on with Print on Demand. In doing this I stumbled onto the world of fine art printing. The basic gist is that you scan or upload a digital image and a print is made on canvas or fine paper that is near museum quality. It is printed and it looks like a painting due to the quality of the ink, the printing process, and the number of ink types (some up to 12 instead of the regular 3 or 4 ink process) .
Giclee (jhee-clay) is one of these fine art printing processes. Giclee Printing Services is one such site. A Lulu like site can be found at Imagekind. Now these prints can be expensive for example a Giclee 17" by 22" print (wilderland map size) is nearly $50. But if you want the best quality map possible this is the way to get it printed out. Some offer scanning services for additional $$$.
This is probably not a viable option for anything in OSR publishing but for the individual gamer it may be a great way of preserving or displaying their own maps at the highest level of quality.
So I keeping an eye on what going on with Print on Demand. In doing this I stumbled onto the world of fine art printing. The basic gist is that you scan or upload a digital image and a print is made on canvas or fine paper that is near museum quality. It is printed and it looks like a painting due to the quality of the ink, the printing process, and the number of ink types (some up to 12 instead of the regular 3 or 4 ink process) .
Giclee (jhee-clay) is one of these fine art printing processes. Giclee Printing Services is one such site. A Lulu like site can be found at Imagekind. Now these prints can be expensive for example a Giclee 17" by 22" print (wilderland map size) is nearly $50. But if you want the best quality map possible this is the way to get it printed out. Some offer scanning services for additional $$$.
This is probably not a viable option for anything in OSR publishing but for the individual gamer it may be a great way of preserving or displaying their own maps at the highest level of quality.
Tuesday, September 28, 2010
A Review of Points of Light
Carnifex gives an informative review of Points of Light.
Appreciate the review and comments. I am glad people are still discovering this even two years after it's release.
Appreciate the review and comments. I am glad people are still discovering this even two years after it's release.
Monday, September 27, 2010
Dungeon Tiles Master Set: The Dungeon Tiles

The part of D&D Esstentials I was looking forward too is the new Dungeon Tile sets. I missed the initial run so I don't have all the basic and I viewed the three sets coming up as an excellent opportunity to finally get them.
I bought the first and it didn't disappoint. The most impressive feature is that the box itself is a dungeon tile. It breaks down into a two inch high platform 9 squares by 12 AND a 1 inch high platform (the cover) 9 squares by 12. The sides are printed with pillars/columns to add to the effect.
Inside there are ten sheets of dungeon tiles. The basics and a few from preexisting sets like the Hall of the Fire Giants. They have the same solid heavy feel as the rest of the dungeon tile series.
Overall this is a good deal at $20 and with the three upcoming sets you pretty much have all the basics covered.
Sunday, September 26, 2010
Straight off the Moldavy Press, The Elf Lord's Temple
On Saturday the 25th I referred the final levels of the Elf Lord's Temple at the Gold Star Anime in Edinboro. I will have a play report later this week but for now I thought everybody would like to see the raw notes I used.
In earlier posts I remarked how minimal the early dungeon write-ups appeared to be. So using the Moldavy dungeon stocking rules I decided to give this a try. The random results were surprisingly easy to make sense of. Easy to fit around the few special locations I knew had to be in the dungeon.
Speficially I generated this using the Moldavy Dungeon Stocking rules level 3 of the Monster & Treasure Assortment for the Ground level, Level 4 for the 1st level of the Temple, and Level 5 for the 2nd level (Maze) portion of the temple.
I am not sure how it work out for a novice referee but as somebody with experience it was easy to look at the entries and come up with the details based on the general theme of the dungeon and the sparse description.
I am planning on fleshing it out for publication later in the year. Basically putting in the details that I come up with during my various playtests.
You can see for yourself by downloading this PDF. If you are planning to attend Erie Days of Gaming and play my events in November don't read this.
In earlier posts I remarked how minimal the early dungeon write-ups appeared to be. So using the Moldavy dungeon stocking rules I decided to give this a try. The random results were surprisingly easy to make sense of. Easy to fit around the few special locations I knew had to be in the dungeon.
Speficially I generated this using the Moldavy Dungeon Stocking rules level 3 of the Monster & Treasure Assortment for the Ground level, Level 4 for the 1st level of the Temple, and Level 5 for the 2nd level (Maze) portion of the temple.
I am not sure how it work out for a novice referee but as somebody with experience it was easy to look at the entries and come up with the details based on the general theme of the dungeon and the sparse description.
I am planning on fleshing it out for publication later in the year. Basically putting in the details that I come up with during my various playtests.
You can see for yourself by downloading this PDF. If you are planning to attend Erie Days of Gaming and play my events in November don't read this.
Saturday, September 25, 2010
A Fantasy Sandbox in Detail Part XVII
Thanks to Zachary of RPG Blog 2 for helping with yesterday's prank.
Part XVI
This is the seventeenth in a series detailing the 34 steps I recommended for making a Fantasy Sandbox Campaign. Today's post will cover part of the following step.
For this post I will go step by step about how I create a town map. Roughly these are the steps I do for hand maps as well.
First I start with a blank hex map. I use .28 inch hexes at 40 feet per hex. This gives enough coverage to draw towns and villages. For cities I go a larger page size.
 I start by turning the Coast layer and drawing in the coast line. At this level rivers are considered coasts as well. Streams, if any are drawn as lines on a separate layer. I try to make the coast line a complete shape that can be filled with white. The coast layer is above the hex layer.
Next I toggle on the water layer and put down a page size rectangle of 20% gray. I copy the coast I drew and copy it to a ground layer beneath the Hex layer. I fill it with white. You may want to look at River Secrets and adding a glow effect for shallow water.
 Next I add in vegetations by drawing areas and filling them in with various terrain fills. I also added some cliff and steep contours. Finally put in cropland. By now you should be getting a sense of how the physical layout will turn out. All this on the vegetation layer and below the hex layer.
 Next I add walls which are a major constraints on how a town is developed. For Mikva I choose to go with an early version of Chepstow Castle. I added wooden palisades. The reasoning is that Mikva isn't wealthy enough to build town walls but does wish to control access to the market. Hence a wooden palisade. All this goes on the Wall layer which is above the Hex layer.
 Now all this is beginning to enough to suggest a network of road. I do this in two stage. First I just focus on the major roads. Later after I place the buildings I will work on minor roads. All of these are lines and filled shapes at 40% gray. The road layer lies above the hex layer.
 I then take the population and divide it by 5 to a rough idea of how many building I will need. This comes from assuming there is an average of 5 people per household. This works out to 160 or so. Because Mikva is still developing as a town I decided that is about half are individual buildings. Most mud and whattle huts. I don't keep an exact count as long as I get close. What I care about is that it looks dense and big enough for the population.
 All this goes on the building layer above the hex layer. Next I finished up the paths by looking at the placement of the buildings. I leave the keying of the map for later after I complete the next several steps of detailing the town.
By computer or by hand you will have a map showing the home base of the players.
Of course many of you are wondering what the heck is going and why this post is here. Well I was wandering around and since some folks have been having trouble distinguishing Bat in the Attic from The RPG Blog 2 I thought it would be just as well that I drop it off here.
Thanks to Zach for agreeing to this. He and I don't collaborate often but it is always fun when we do. (Thanks again for having me on the podcast). So I hope you, everybody else, and especially Jim enjoy our little prank.
That it for part XVII next is Part XVIII where we go into further detail about the town of Mikva and return back to the Attic.
Part XVI
This is the seventeenth in a series detailing the 34 steps I recommended for making a Fantasy Sandbox Campaign. Today's post will cover part of the following step.
Pick the starting population locale and draw a full page map of the settlement. This is the "Home Base"From Step VIII
0403 Mikva (castle, town) Human
This is a small castle town of 800 humans with several dozen Dwarves and Halflings. The castle itself sits on a bluff overlooking the bay. It is the seat of the current Baron of Piall, Argus Gervon. A several trading vessels stop here every week to pick up ingots from Southpoint. Before the fall monsoon season dozens of traders put in at Mikva to attend the Piall Fair. Here the island’s grain, and more importantly wool is traded for goods and supplies needed for the next year.
Currently the King’s Sheriff Tomar Revan is staying at the one of the wealthiest merchants in Mikva; the Honorable Orlon Beras. The Sheriff is currently using offices at the Mikva Trading Hall to conduct his investigation and any other Royal business. There is considerable tension between Baron Argus and the Sheriff.
For this post I will go step by step about how I create a town map. Roughly these are the steps I do for hand maps as well.
First I start with a blank hex map. I use .28 inch hexes at 40 feet per hex. This gives enough coverage to draw towns and villages. For cities I go a larger page size.
 I start by turning the Coast layer and drawing in the coast line. At this level rivers are considered coasts as well. Streams, if any are drawn as lines on a separate layer. I try to make the coast line a complete shape that can be filled with white. The coast layer is above the hex layer.
Next I toggle on the water layer and put down a page size rectangle of 20% gray. I copy the coast I drew and copy it to a ground layer beneath the Hex layer. I fill it with white. You may want to look at River Secrets and adding a glow effect for shallow water.
 Next I add in vegetations by drawing areas and filling them in with various terrain fills. I also added some cliff and steep contours. Finally put in cropland. By now you should be getting a sense of how the physical layout will turn out. All this on the vegetation layer and below the hex layer.
 Next I add walls which are a major constraints on how a town is developed. For Mikva I choose to go with an early version of Chepstow Castle. I added wooden palisades. The reasoning is that Mikva isn't wealthy enough to build town walls but does wish to control access to the market. Hence a wooden palisade. All this goes on the Wall layer which is above the Hex layer.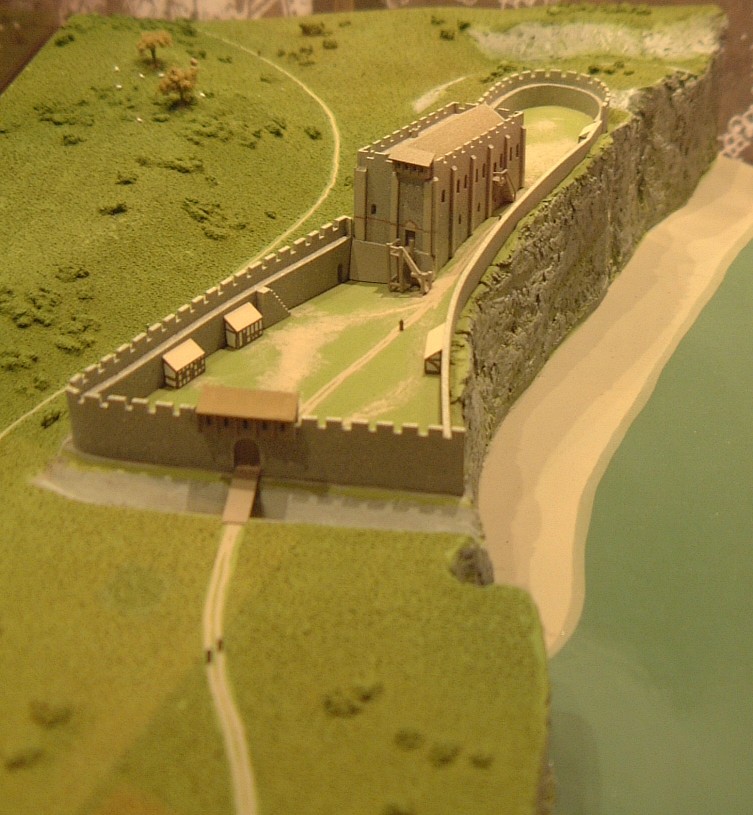
 Now all this is beginning to enough to suggest a network of road. I do this in two stage. First I just focus on the major roads. Later after I place the buildings I will work on minor roads. All of these are lines and filled shapes at 40% gray. The road layer lies above the hex layer.
 I then take the population and divide it by 5 to a rough idea of how many building I will need. This comes from assuming there is an average of 5 people per household. This works out to 160 or so. Because Mikva is still developing as a town I decided that is about half are individual buildings. Most mud and whattle huts. I don't keep an exact count as long as I get close. What I care about is that it looks dense and big enough for the population.
 All this goes on the building layer above the hex layer. Next I finished up the paths by looking at the placement of the buildings. I leave the keying of the map for later after I complete the next several steps of detailing the town.
By computer or by hand you will have a map showing the home base of the players.
Of course many of you are wondering what the heck is going and why this post is here. Well I was wandering around and since some folks have been having trouble distinguishing Bat in the Attic from The RPG Blog 2 I thought it would be just as well that I drop it off here.
Thanks to Zach for agreeing to this. He and I don't collaborate often but it is always fun when we do. (Thanks again for having me on the podcast). So I hope you, everybody else, and especially Jim enjoy our little prank.
That it for part XVII next is Part XVIII where we go into further detail about the town of Mikva and return back to the Attic.
Friday, September 24, 2010
Adventuring Group Charters
Hey guys! Zachary Houghton from RPG Blog 2 here! Since Mr. Raggi of Lamentations of the Flame Princess can’t seem to tell Mr. Conley from Mr. Houghton, in spite of the fact that he deals with us both on a fairly regular basis, we’ve done a bit of a switch today. After all, we’re interchangeable in Raggi’s eyes!
There are a few key differences however.
Rob wrote the Majestic Wilderlands, one of the most entertaining takes on a setting in recent memory.
I…did not.
Rob is a wonderful cartographer, whose mapwork is rightly praised as being in an excellent, useful, and classic style.
I…am not.
Well, sure we could go on, but I feel like stopping there, don’t you? Instead, let’s talk about adventuring group contracts or charters. I’m not talking about a social contract, where the players decide things such as who brings food, how to handle disruptions, etc. No, this is a group charter, for player characters. Its main purpose to set a baseline in divvying up loot, treasure, and payment for services rendered.
For example, in a group of four, the charter might read the 20% of any profit from loot and treasure goes to each group member, with the remaining 20% going to group costs (resurrections, potions, lodging, supplies, etc.)
The benefits of a group charter are that everyone has an idea how treasure will be split up, leading to less argument, back-stabbing, and in-game delay. Here are a few possible ideas for your charter:
-Magic users can argue whether or not the cost of their components should be covered. Fighters and others can try to put in a stipulation that they are recompensed for broken/lost weapons or armor.
-Magic items can be split up by means of a rotation. If #1 gets the magic spear, great. He drops to spot #4, and the next man up gets first chance at the next magic item. If no one wants the item, it is sold, and the money is split.
-Magic items can also be bid upon, using the loot shares from the treasure haul. If the mage bids 5000 gold for that Staff of Power, that 5000 gold is spread among the other players.
-Roleplaying these negotiations when a new player comes in can be a lot of fun—do you give them a lesser share until they’ve proven themselves?
-How are henchman provided for? Do they get a few coppers for each expedition, or are they paid out of the common share? Be careful—pay them too little and you might be at the wrong end of the coup de gras on second watch!
Likewise, negotiating perks can be a blast, too, even if your character doesn’t survive the adventuring. Does your Adventurer’s Guild Charter include paying the cost of an elaborate funeral for a fallen member?
If you haven’t already, consider suggesting to your players that their characters take the time to write up a group charter. It can be as fancy or plain as you want, but if it saves time arguing over that +1 dagger or how to divvy up the dragon’s hoard, you might find it a valuable addition to your game.
There are a few key differences however.
Rob wrote the Majestic Wilderlands, one of the most entertaining takes on a setting in recent memory.
I…did not.
Rob is a wonderful cartographer, whose mapwork is rightly praised as being in an excellent, useful, and classic style.
I…am not.
Well, sure we could go on, but I feel like stopping there, don’t you? Instead, let’s talk about adventuring group contracts or charters. I’m not talking about a social contract, where the players decide things such as who brings food, how to handle disruptions, etc. No, this is a group charter, for player characters. Its main purpose to set a baseline in divvying up loot, treasure, and payment for services rendered.
For example, in a group of four, the charter might read the 20% of any profit from loot and treasure goes to each group member, with the remaining 20% going to group costs (resurrections, potions, lodging, supplies, etc.)
The benefits of a group charter are that everyone has an idea how treasure will be split up, leading to less argument, back-stabbing, and in-game delay. Here are a few possible ideas for your charter:
-Magic users can argue whether or not the cost of their components should be covered. Fighters and others can try to put in a stipulation that they are recompensed for broken/lost weapons or armor.
-Magic items can be split up by means of a rotation. If #1 gets the magic spear, great. He drops to spot #4, and the next man up gets first chance at the next magic item. If no one wants the item, it is sold, and the money is split.
-Magic items can also be bid upon, using the loot shares from the treasure haul. If the mage bids 5000 gold for that Staff of Power, that 5000 gold is spread among the other players.
-Roleplaying these negotiations when a new player comes in can be a lot of fun—do you give them a lesser share until they’ve proven themselves?
-How are henchman provided for? Do they get a few coppers for each expedition, or are they paid out of the common share? Be careful—pay them too little and you might be at the wrong end of the coup de gras on second watch!
Likewise, negotiating perks can be a blast, too, even if your character doesn’t survive the adventuring. Does your Adventurer’s Guild Charter include paying the cost of an elaborate funeral for a fallen member?
If you haven’t already, consider suggesting to your players that their characters take the time to write up a group charter. It can be as fancy or plain as you want, but if it saves time arguing over that +1 dagger or how to divvy up the dragon’s hoard, you might find it a valuable addition to your game.
Subscribe to:
Posts (Atom)